
Profit Maker - makes money while you do your business.
CLIENT REGISTRATION
PLEASE FILL OUT THE SIMPLE FORM AND RECEIVE YOUR ID:
❗️ATTENTION ❗️
Do Not Interfere With the Bot's Operation!
Trading Rules: Important Instructions
Do NOT trade manually on your sub-account while the bot is running. Manual intervention disrupts the trading strategy and financial tracking. For manual trading, create a separate sub-account.
To withdraw funds or stop the bot, contact your Agent/Consultant by Phone call, Email or our submission form.
Following these rules ensures optimal performance and accurate accounting.
1. Setting Up Gmail with Google Authenticator (2FA)
How to Set Up Google Authenticator (2FA) for Your Gmail Account
1. Create a Gmail Account (If Needed)
If you don’t have 2FA or a Gmail account, register at gmail.com.
2. Download Google Authenticator
Android: Install from Google Play.
iPhone: Install from the App Store.
Search for “Google Authenticator” in the store.
3. Link Your Gmail During Setup
Open the app and enter your Gmail address when prompted.
4. Add a One-Time Verification Code
Google will request a one-time code. Proceed to the next step.
5. Access Your Google Account Settings
Log in to Gmail → Click your profile icon → Manage your Google Account.
6. Navigate to Security Recommendations
Under Privacy & Security, check for available recommendations (e.g., adding a backup phone number).
If none appear, return to the main menu.
7. Enable 2FA in Security Settings
Go to Security → 2-Step Verification → Get Started.
Select Authenticator app → Set up.
8. Scan the QR Code
On your computer screen, a QR code will appear.
Open Google Authenticator on your phone → Tap Scan QR Code and align your camera.
Enter the generated 6-digit code to confirm.
9. Verify Setup in Authenticator
In the app, tap your account profile (top right) → Confirm the login method is gmail.com.
10. Activate Two-Factor Authentication
Return to Google Account → Security → Enable 2-Step Verification (look for the green checkmark).
Note: Requires a non-local phone number for full activation.
11. Enable Enhanced Protection
Go to Security → Enhanced Safe Browsing → Toggle ON.
12. Backup & Transfer Test (Critical!)
Practice transferring 2FA to a secondary device (e.g., tablet or another phone) to ensure access recovery.
2. Guide to Register on Bybit
Registering and Setting Up an Account on Bybit (Other Exchanges Are Similar)
1. Register Your Main Bybit Account
Click on our secure link to Bybit’s official website
Click "Sign Up" (top-right corner) - USE ONLY LOGIN AND PASSWORD ACCESS - dont use GOOGLE, APPLE, YANDEX etc ID regidtration.
⚠️ Critical Security Measures
Always write down in a physical notebook:
All login credentials
2FA backup codes
API keys (if used)
Recovery phrases
Never store sensitive data in:
Screenshots (vulnerable to AI hacking)
Cloud notes (Google Keep, Evernote)
Messaging apps (Telegram, WhatsApp)
Remember:
🔐 Your security is only as strong as your weakest backup method
ВНИМАНИЕ!
Используйте только наши проверенные ссылки на биржи:
Post-Registration Account Setup Guide
1. Identity Verification Process
1️⃣ Passport Verification
2️⃣ Address Confirmation (If Required)
Acceptable documents:
Utility bill (electricity/water/gas)
Housing maintenance payment receipt
Bank statement
*Documents can be in Russian for Russian passport holders.
File requirements: JPG/PDF under 5MB
2. Make Initial Trading Test
1️⃣ Deposit 10 USDT
Recommended transfer method: TRC-20 network (lower fees)
Minimum test amount: $10 equivalent
Wait for 1 network confirmation
2️⃣ Manual Trade Execution
Market: USDT/BTC or USDT/ETH
Order type: Limit order
Amount: 5 USDT
3. Bot Integration Readiness Checklist
✓ Account fully verified
✓ Successful test deposit confirmed
✓ Manual trades executed properly
✓ 2FA enabled on all access levels
✓ API keys properly configured (if applicable)
Critical Security Setup for Your Bybit Account
Enable Anti-Phishing Protection:
Go to:
⚙️ Account Settings → 🔒 Security → Anti-Phishing Protection
Set a unique phishing code (4-20 letters/numbers)
Example: BybitSecure123 (don’t use this!)
Save changes
✅ Result:
All official Bybit emails will include this code.
No code? = Likely a phishing scam! Delete it.
4️⃣ Set Up Google Authenticator (2FA) – Mandator
Why? Blocks 99% of hacking attempts.
Go to 🔒 Security → 2FA Settings → Google Authenticator
Scan the QR code or enter the manual key
Enter the 6-digit code to confirm
Save backup codes (in a physical notebook!)
Final Security Checklist
✔️ Anti-phishing code = Active
✔️ Google 2FA = Enabled
✔️ Backup codes = Written offline
✔️ Tested recovery (can you access if phone is lost?)
🚨 REMEMBER:
This is 100% your responsibility – exchanges cannot reset passwords without 2FA.
Test recovery – ensure you can log in using your backups.
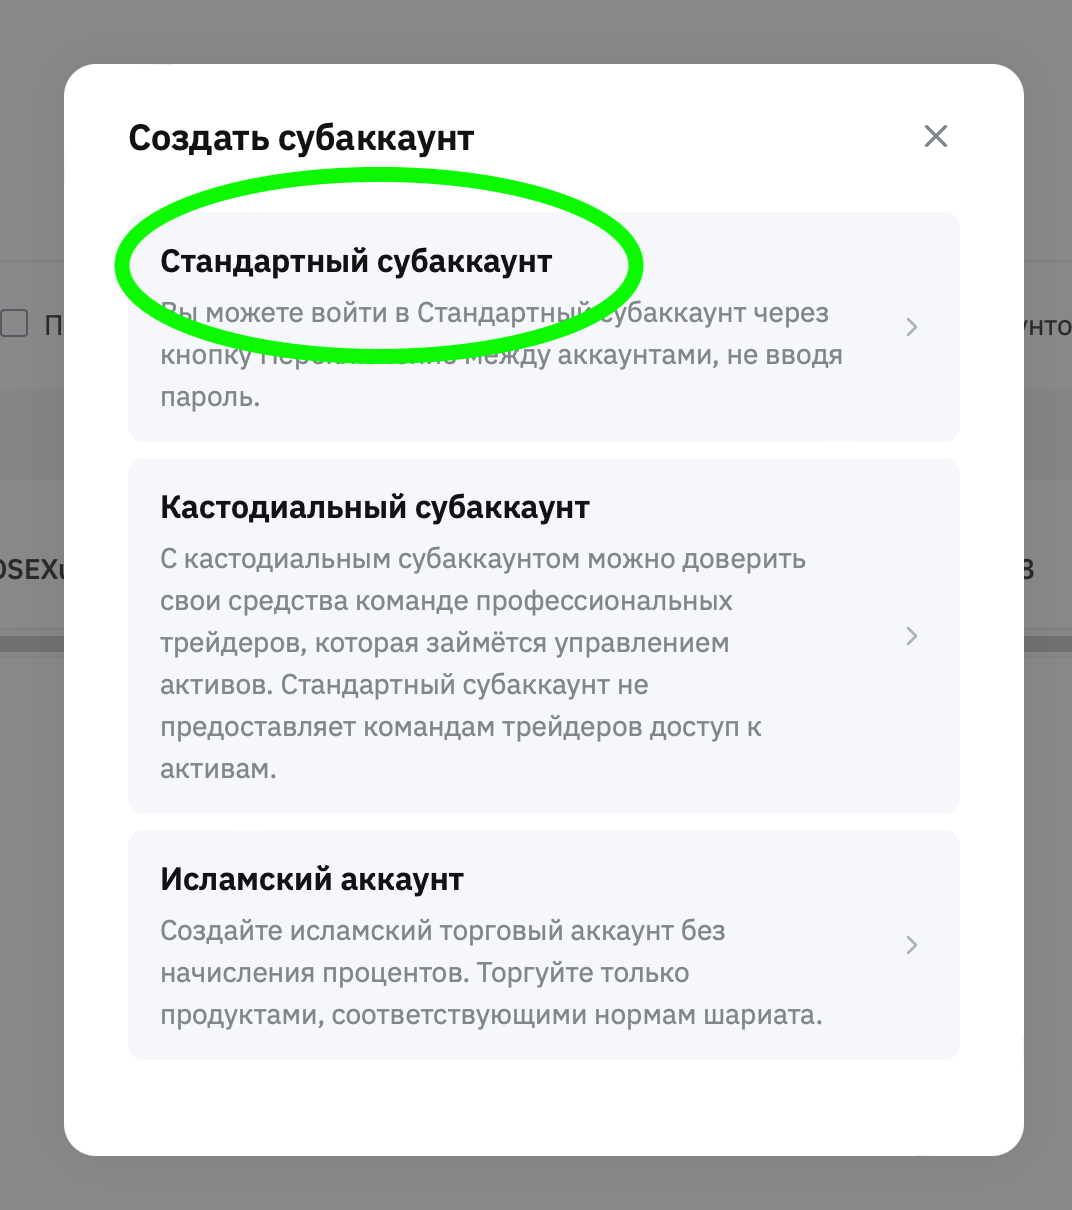
3. Step-by-Step Guide: Creating a Sub-Account on Bybit
How to Create a Sub-Account (Bybit Example)
Creating a sub-account is simple, and the process is similar across most exchanges. Here’s how to do it on Bybit:
Hover over your account icon → A menu will appear.
Select "Sub-Account" → Click the yellow "Create Sub-Account" button (top-right).
Choose "Standard Sub-Account".
Enter a name (e.g., "LuckyAccount").
Under "Account Type", select "Unified Trading Account".
If required, a verification code will be sent to your email. Enter it to proceed.
Your new sub-account will appear in the "Sub-Account" section. Click "Switch".

✅ Done! You’re now in your sub-account, where you can connect a trading bot
то потеряете доступ к вашим деньгам!
⚠️ SECURITY WARNING: Save Your Account Credentials!
You MUST manually write down the following in a secure offline location (paper notebook):
Bybit Login Email/Phone
Bybit Password
Main Account UID (find in Account Settings)
🔐 SUB-ACCOUNT CREDENTIALS
Sub-Account Login Email
Sub-Account Password
Sub-Account UID
❌ WHAT HAPPENS IF YOU LOSE THIS DATA?
No recovery – Bybit cannot restore access if you lose 2FA + credentials.
Funds become permanently inaccessible if you forget passwords/UIDs.
✅ SECURE STORAGE TIPS
Use pen and paper – never store in digital notes/cloud/screenshots.
Keep in a fireproof safe or bank deposit box.
Share only with trusted heirs (family/lawyer).
🔗 Where to Find UID
Log in → Click profile icon → "Account & Security"
Under "Basic Info", locate:
Main Account UID (e.g., 123456)
Sub-Account UID (visible after switching to sub-account)
🚨 REMEMBER:
This is 100% your responsibility – exchanges cannot reset passwords without 2FA.
Test recovery – ensure you can log in using your backups.
4. Пополнение основного аккаунта валютой USDT:
ДАЛЕЕ переводите на ваш основной аккаунт нужную вам сумму для инвестиции в Profit Maker:
1) Сначала деньги должны быть на ОСНОВНОМ вашем BYBIT (в котором вы открыли субаккаунт)
для этого войдите в основной аккаунт-ФИНАНСИРОВАНИЯ-ВНЕСТИ -
справка: сети бывают разные. поэтому внимательно проверяйте сети перед отправкой денег (см. *справку по сетям)
пример1: TETHER=ETHERIUM (ERC20)
пример 2: TRON=TRC20
чтобы не конвертировать лишний раз свою валюту, вносите на свой счет токены той сети, в которой они хранятся у вас в крипто- кошельке
После перевода денег - перейдите - аккаунт-обзор - проверьте поступление.
Покупка и обмен USDT - варианты:
5. Now move your USDT to Subaccount:
How to Transfer 1000 USDT to Your Sub-Account's Unified Trading Account
Step 1:
Log in to your Bybit main account
Navigate to "Asset Overview" in the top menu
Step 2: Initiate Internal Transfer
Click the "Transfer" button (top-right corner)
In the transfer pop-up window:
Select transfer type: "Between Sub-Accounts" (top option)
Configure transfer details:
From: "Main Account (Funding)"
To: "[Your Bot's Name] Unified Trading Account"
Coin: USDT
Amount: Enter 3000 (*minimum amount option)
Key Notes:
• No transfer fees for internal moves between accounts
• Minimum transfer amount may apply (typically 1 USDT)
• Ensure funds are in Unified Trading Account, not Funding


6. Creating Your API Keys on Bybit Exchange
1. Creating API Keys for Your Bybit Sub-Account
Step 1: Access Your Sub-Account
From the dropdown, verify you're in the correct sub-account (check account name/UID)
Step 2: Navigate to API Management
Scroll down in the menu → Select "API" section
Click the "Create New Key" button (right side)
Step 3: Configure API Key
In API Management, select:
Key Type: "System-Generated API" (most secure)
Step 4: Naming Your API Key
⚠️ Don't skip this step! Assign a clear, meaningful name to identify your API key’s purpose.
How to Name Your Key:
In the "API Key Name" field, enter a descriptive label, such as:
MyLuckyInvestment (for general trading)
Why It Matters:
Helps track which services/apps use the key
Next Steps:
→ Proceed to set permissions (Step 5)
→ Save your key securely (Step 6)
Critical API Permission Settings
🔐 Step 5: Configure API Key Permissions
When creating your API key for the trading bot, carefully check these boxes:
✅ Enable:
"Trade" (allows the bot to execute orders)
"Read-Only" (view balances/positions)
❌ Disable (MUST!):
"Withdraw" (⚠️ Never allow this – prevents fund theft)
"Transfer" (blocks moving assets between accounts)
Why This Matters
Bots only need trading access – withdrawals are unnecessary and dangerous.
Even if hacked, thieves can't steal your funds without withdrawal rights.
Finalize & Secure
Confirm with 2FA (Google Authenticator/SMS)
IMPORTANT: Copy the API Key and Secret immediately (Secret is shown once only)
Store offline: Write on paper or use encrypted password managers
Step 5: Securing & Sharing Your API Keys
After creating the API key, you’ll see a pop-up with:
API Key
Secret Key (shown only once!)
What to Do Immediately:
Copy Both Keys
Paste them into a secure offline file (e.g., encrypted note).
Or handwrite them in a physical notebook.
Share Keys with Trusted Partners (button below)
Use secure channels e.g., encrypted messaging (*get it from your Partner/Agent)
❗️ATTENTION ❗️
Do Not Interfere With the Bot's Operation!
Trading Rules: Important Instructions
Do NOT trade manually on your sub-account while the bot is running. Manual intervention disrupts the trading strategy and financial tracking. For manual trading, create a separate sub-account.
To withdraw all funds or stop the bot, contact your Agent/Consultant by Phone call, Email or our submission form.
Following these rules ensures optimal performance and accurate accounting.
Клиенты выбирают именно нас
Накапливайте большие деньги с помощью капитализации!
Всё, что заработал бот, автоматически, ежеминутно капитализируется! Пополняйте ежемесячно депозит на небольшую сумму и накопите очень приличную сумму.
Надежное хранение денежных средств в USDT.
Нет риска потери денег из-за инфляции или падения курса рубля
Абсолютная ликвидность!
И при выводе денег вы не теряете накопленные проценты!
В отличие от хранения денег в банках или в недвижимости. Вы можете выводить не только проценты в любое время, но и сам депозит.
Неоспоримые преимущества только у нас!
Доходность программы-бота составляет от 50 до 100% годовых в Долларах США!
При размещении капитала от 5000 USD можно распределить ваш капитал на 2-3 разных биржи для получения общего усредненного процента по трем биржам!
Работа программы ограничена лучшими в мире 20 монетами!
ETH, DOGE. ADA. BNB, XRP, LINK, LTC, DOT, SUI, XLM, UNI, APT, ETC, TRX, ICP, LDO, AVAX, HBAR, VET, ARB
Многолетняя официальная статистика только у нас!
Вы хотите стабильно и без потерь зарабатывать на крипто-рынке? Вам нужны готовые и проверенные решения.
Клиенты выбирают именно нас
Отличный пассивный доход!
Доходность программы-бота составляет от 50 до 100% годовых в Долларах США!
Поэтому деньги защищены от рублевой инфляции.
Полный контроль и защита ваших средств!
только вы контролируете ваш аккаунт. И только вы подтверждаете и делаете вывод денег. Защита GOOGLE 2FA.
Готовы к прибыли?
Оставьте свой номер и ждите звонка нашего менеджера.
Profit Maker™, renet.uk™, (CMS Group LL)
посетите наш основной сайт renet.uk
+7 964 599-10-22
Avangardnaya street, 3
Moscow, Russia, 125167 (ID 7743746592)
renetuk@yandex.ru
please call: 10.00-20.00*
*Coordinated Universal Time